
Common Drywall Issues and Fixes in Denver, Co: Learn What to do If You Have a Hole or Crack
Many people are unaware of the different drywall issues that can occur in their homes. Drywall is installed throughout many buildings including businesses, schools, and private residences. It is important to know how to properly repair your drywall so you do not have any issues later on down the line. This blog post will teach you about common drywall problems and what you can do if you experience them.
Whatever name you give it, drywall will need to be repaired at some point. Drywall is a modern construction material made up of large panels (usually 4 feet by 8 feet) with a gypsum core sandwiched between two thick paper faces. These recycled-paper facings are generally very smooth. The surfacing face is smooth, and the back face is rough. This makes it harder to notice the location of the seam between drywall panels, and this gives more freedom in placement after cutting or shaping during drywall installation on walls or ceilings.
Drywall repair in Denver can range from minor to serious depending on where they are located and how big they are. Some common issues include holes, cracks, and uneven drywall.
Here are some methods for repairing drywall issues at your house.
Repairing Popped Nails
Many residences are constructed using just ring-shanked nails and no adhesive rather than the traditional technique of fastening drywall to studs or ceiling joists with construction adhesive and drywall screws. Although utilizing merely ring-shanked nails is a valid method of construction, it has drawbacks in the long run because wood studs might dehydrate or bend. Wood studs may also warp as a result of temperature and humidity fluctuations. In the event that drywall nails are applied to wood studs or ceiling joists, it's important for homeowners to understand how to fix popped nails around their homes.
Then you have little "nail pops," which are "so much fun" to try and repair because you must drywall patch and paint.
To repair a popped drywall nail proceed as follows:
- Above and below the lifted nail, attach a 1 1/4-inch, #6 coarse-thread drywall screw. Make sure the screw is only fastened to the surface of the drywall paper just below its surface, not so much that it tears through it.
- If you don't have drywall screws, you may use the same ring-shank nails that caused the pop. Drive them in above and below the popped nail until they are slightly recessed and there is a faint dimple in the drywall surface from the head of the hammer.
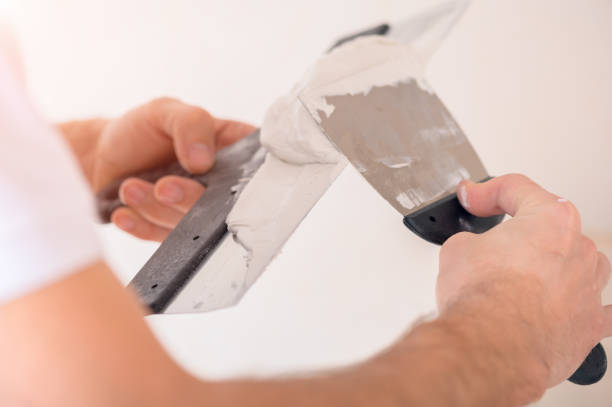
- Apply a first coat of premixed drywall joint compound or spackle.
- Using a circular motion, spread the epoxy thinly and evenly over your wood. When the epoxy is smooth, apply another coat. The edges of the tile should be feathered. If you're working with cheaper tiles, consider feathering them to blend in better with surrounding materials. Use a 4 to 6-inch flat blade taping knife (or drywall taping knife) to apply the compound.
- Wait 24 hours after the epoxy is fully dry before sanding. Using a sanding block and 200 grit sandpaper, lightly sand the coating after it has been allowed to dry for 24 hours. You must use a firm backing for good outcomes!
- As soon as the epoxy has cured, inspect the drywall repair. If the seal shrank or showed holes, apply more joint compound and sanding.
- You may then prime and paint after the repair is dry and sanded smooth (close your eyes and feel the drywall repair with your hand).
Repairing a Dent in Drywall
A dent in drywall can be a tricky issue. The easiest way to repair a dent is with a hammer and a screwdriver. You want to start by using a screwdriver to straighten the metal from the drywall from the inside of the drywall hole. Put some pressure on it and use your fingers to make sure it doesn't move back to its original shape. Next, use a hammer and tap it until it pops back into shape. Remove any loose pieces or bumpy areas with a putty knife or trim knife so that the area is flat again. Once you've done this, apply joint compound or spackle over top of the hole so that it's level with the rest of the wall. Wait for this layer to dry, and then paint your wall.

Repairing a Hole in Drywall
Holes can also be repaired with joint compound or spackle; however, if the hole is larger than 16 inches (40 cm), you should use fiberglass mesh tape to cover it before applying patching material. The purpose of this paper is that it provides a flat surface for the drywall compound and sanding.
Put some joint compound or spackle on top of your mesh tape and spread it around with your putty knife (or you can use an old credit card instead). Carefully remove any air bubbles from under the paper, as they will cause bumps in your final repair drywall. A good way to remove air bubbles is by pressing down on the center of your drywall compound with an old credit card. If you still have some small holes in the paper, use a damp cloth or wet fingertip and smooth them out.
After 24 hours, sand over your patch until it's level with the rest of the wall (or ceiling drywall). If you're not satisfied with the patch drywall, simply add more compound and sand again.
Repairing Split or Bubbled Drywall Joint Tape
Repairing paper tape issues is more difficult than nail pops or drywall dents because you'll be removing a 2-inch-wide layer of paper tape, resulting in a larger repair site. However, if you follow these steps, it's not difficult to mend:
- Using a very sharp knife or breakaway razor utility tool, cut away the damaged area drywall tape in the affected area. Then carefully remove the damaged section of tape. You'll be removing little clumps of dried drywall joint compound as well; it's fine.
- Using a 4-inch drywall flat blade taping knife (again, the low-cost plastic variety is acceptable), spread brand new tape as a bed for the premixed drywall joint compound in an opened drywall joint. Make sure to apply it completely over the tape's width and length.
- To prevent damage to the paper, cut your new piece of drywall tape to appropriate length.
- Center the drywall tape on the junction with your slightly wetted 4-inch drywall flat blade taping knife, drawing it down along the tape in a 45-degree angle while pressing it fully and firmly into the compound bedding. The compound will seep out around the edges, which is an excellent thing.
- Allow to dry overnight and scrape away any high areas with the taping knife the next day.
- Apply a second coat of joint compound using a 10-inch taping knife. Using a slightly wetted taping knife, apply a second layer of premixed joint compound that is 6 to 8 inches thick and covers the first layer.
- Place the taping knife at a 90-degree angle to the taped joint and draw it down the repaired area in one fluid movement. Remove any excess from the edges. The taping should be smooth throughout its entire extent. It may have some bubbles, but that's better than nothing!
- Allow to dry overnight and remove any high areas with the taping knife the next day.
- Apply a third and final layer of joint compound with a lightly dampened 10-inch taping knife. Apply the joint compound to an area that is roughly 8 to 10 inches wide.
- Allow to dry overnight and remove any high sections with the taping knife the next day, then lightly sand using a sanding block and 200 grit sandpaper.
- When the drywall repairs is fully dry, inspect it. If the compound has shrunk or you find pits, apply more joint compound and sanding.
- You may then prime and paint the repaired area once it has been dry and sanded smooth (close your eyes and feel the repair drywall with your hand).
One of those things that is simple to learn but tough to master is drywall repair. Sure, there may be a YouTube video that illustrates how to mend drywall, but if you're doing it for the first time, you've got a good chance of being disappointed with the final result. Hiring an drywall contractor is the only way to get a professional repair job.
At Harmony Painting, we strive to ensure that your demands are met and that you are completely pleased with the work done on your project. Whether it's for household or commercial purposes... We will do all we can to satisfy, if not surpass, your expectations, whether it's a small or large project. Schedule your free drywall repair estimate in Denver now at https://harmonypaintingdenver.com/denver-residential-painting-services/interior-painting/drywall-repair/.